
(Last Updated 05 October 2013)
The aim of this document is to help guide you through the process of getting a SHOUTcast 2 system installed and broadcasting so people can connect to it through the SHOUTcast Radio Directory and hear the great content you have and want to provide to the world.
It is assumed you know how to setup your network to allow your DNAS Server to be visible when broadcasting on the internet (if required) which includes any router(s) and port(s).
This guide will refer you to appropriate places in the documentation provided with the tools. These referenced sections provide more detailed information on the option or feature such as what would need to be set in the Transcoder configuration to allow it to work with the DNAS Server being setup.
If you are new to SHOUTcast then this is probably something you may have already asked or you are trying to find out.
At its most basic, the SHOUTcast system is based around a 'client + server' configuration which allows you to run a DNAS Server (either directly or via a hosted service) which can then provide stream(s) of the 'source' connected to the server to any clients connected to the DNAS Server.
So a simple SHOUTcast setup would consist of the following:
This is not the only way to setup a SHOUTcast system and more examples can be seen in the
shoutcast_system_overview.txt which goes into more detail about the way SHOUTcast works
as well as other ways of setting up a SHOUTcast system (see section 2.0).
The SHOUTcast DNAS Server and Transcoder are both built to be run from the command-line console (or as a native service if using this mode) which may appear to be daunting when most interaction done with the operating system is done via a graphical interface (GUI).
If you are not acquainted with using the command-line console then you will need to find a guide which shows you the basics of using the command-line console along with getting you familiar with using it before trying to get any of the SHOUTcast tools running. If you search for 'how to use the command prompt' then you should find a guide which you can follow to help get you knowledgeable enough with using the command-line console.
This may appear to be a step backwards if you previously used the v1 DNAS Server with its very basic GUI wrapper which otherwise was acting in the same manner as the command-line console just without the look of the operating system. However the v1 DNAS Server was at its core a command-line tool just like the v2 DNAS Server is now.
With the DNAS Server and Transcoder, in most cases you will just need to double-click a file to get them running. For more advanced functionality it is assumed you have a basic knowledge of how to use the command-line console for the platform you decide to install the tools on i.e. how to run and control a program via the command-line console including being able to pass commands and the sending of signals as is appropriate to the platform.
Due to the UAC feature (http://en.wikipedia.org/wiki/User_Account_Control) of these OSes you will need to remember the effect that this will have on editing and saving of files.
By default the Windows versions of the installer will choose the native 'Program Files' folder (*) but unless you have disabled UAC or do not have full access to the folder then you will find attempts to save and edit any configuration files will not work.
If this is an issue then you should either choose a different folder of all of the files or change where the tools are trying to save files and also to save any changes in your configuration files with a text editor which is running with administrator permissions.
This is an unfortunate inconvenience though for making it easier to known where all of the configuration examples and documentation can be found is better. Finally there is no reason not to choose a different folder when installing the tools if you experience this.
(*) This will be slightly different depending on if you are using the 32-bit or 64-bit version of the OS as well as the language of the OS. As well the installer will pick the native 'Program Files' folder so installing the 32-bit version on the 64-bit OS will use 'Program Files (x86)' whereas installing the 64-bit version on the same OS will use 'Program Files'.
To make your SHOUTcast system you will need the following software tools and hardware:
There are versions of the DNAS Server and Transcoder available on the following operating systems:
Windows 32-bit Windows 2000, XP, Vista, Windows 7, Windows 8
Windows 64-bit 64-bit versions of Windows XP, Vista, Windows 7, Windows 8
Linux 32-bit Should generally work on most Linux distributions (though is mainly tested on CentOS 5.x)
Linux 64-bit
Raspbian (Raspberry Pi)
Mac OS X (not actively developed as of this update)
BSD 8.x (not actively developed as of this update)
Remember to download the version of the tools which apply to the operating system you will be installing the tools onto e.g. you could install the 32-bit Windows version on Windows 7 64-bit but could not install the 64-bit Windows version on Windows XP 32-bit.
If using machines with different operating systems for different tasks then there should not be any problems with them working together e.g. Windows for the source and Linux for the DNAS Server. This is because the tools use the same communication style irrespective of the platform they are being run on. If you do find an incompatibility then please report it.
When following the steps listed, follow the steps which are applicable to the operating system and the tool you are attempting to install. If you want to install more than one thing then it is better to work through the guide for one tool at a time especially when you are new to SHOUTcast instead of trying to do everything all at once and it failing / getting confused.
It is recommended to setup the DNAS server first before attempting to setup sources.
To begin with you will need to download the correct version for the operating system you are setting up your SHOUTcast system on. See see section 2.1 for clarification of the supported operating systems. The current versions of the SHOUTcast tools can be obtained from:
http://www.shoutcast.com/broadcast-tools
or
http://forums.winamp.com/showthread.php?t=324877 (*)
Remember you will need to download a DNAS Server (sc_serv) and a source for the DNAS Server which can be the Transcoder (sc_trans) or if using Windows then you can also use the Source DSP plug-in (dsp_sc) for Winamp (which may work on non-Windows systems using WINE but is not guaranteed and no support is offered with such a setup).
There are a number of third party tools (free and paid) which can be used as a source for a DNAS server. These are not covered as part of this guide and if you decide you want to use one of these programs then you will need to consult their help for getting it to work with the DNAS Server. In all cases, you will need a DNAS server correctly setup.
(*) This is a summary page and contains links to the latest versions of the tools such as when a new release has just been released or is being tested before it is provided via the main SHOUTcast site download page at http://www.shoutcast.com/broadcast-tools
Choose an install location for the tool you want to install (be it the DNAS Server, Transcoder or the Source DSP plug-in for Winamp) as needed for the SHOUTcast setup you are making on the machine.
On Windows this choice is handled via the installer which attempts to select a sensible new location or it will re-uses the previous install location if doing an upgrade of a v2 based install previously made. This can be changed if needed during install and will need to be done if you are running on a Windows version with UAC enabled (section 1.3).
On non-Windows operating systems you can choose any location for the extracted location of the files as long as you have the correct permission and access for the folder chosen.
On Windows you now need to run the installer, using the folder you have decided on along with ensuring the option to install the documentation has been checked. Doing this will install the documentation and all related files which are referenced in the later stages of this guide.
If using Windows Vista or newer, ensure you install into a location which
allows you to create / edit files preferably without having to respond to a
UAC access prompt. See section 1.3 for more information about doing this.
On non-Windows you now need to extract all of the contents of the archives you have downloaded into the install location decided on.
The following sections are grouped together for what needs to be done in configuring and getting ready to start one or more of the officially provided tools. If you are not using one or more of them then you can skip the section as appropriate. Remember that you will need to have a valid source for use with the DNAS in order to have a listenable stream.
It is important to ensure the DNAS Server is properly configured. This can be
one you are setting up or an existing or hosted DNAS Servers as unless one is
running it will prevent any sources being used from being setup correctly..
To get the DNAS Server running for the first time you will need to run the 'setup' mode by running setup.bat (Windows) or setup.sh (non-Windows). This will start the DNAS Server and open the setup page in the system's default browser and follow the instructions on the information which is requested.
If you do not have a default system browser or are running this in a shell, follow the instructions shown by the DNAS Server from the open command-line / shell window.
By following the 'setup mode' instructions, you will be prompted for common settings needed to run the DNAS Server e.g. passwords. Once completed, the configuration settings will be saved as sc_serv.conf in the same folder as the DNAS Server program file (assuming there were no issues. If thre is an issue then you will be notified and may need to resolve the issue or manually save the configuration file yourself.
Once this is complete, you will then be able to exit 'setup mode' or continue running the DNAS Server with the saved settings where it will then be in a state where it is ready to accept a stream source.
If you are upgrading the DNAS Server from an earlier version, installing into the same folder or just replacing the sc_serv[.exe] program file is all that needs to be done. It is a good idea to also install the documentation for the new version so you have an appropriate local copy to refer to as needed.
This can be done for upgrading an existing v1 or v2 based DNAS Server installation.
If upgrading the DNAS Server but are doing it on a different machine (as part of a migration) and / or location from where it was previously, if you already have a working configuration file then it can be copied over to the new location and you need to ensure it is named sc_serv.conf or sc_serv.ini as this will allow the DNAS Server to automatically use it when started. Additionally if moving the configuration file, check that any paths referenced in the file are ok and exist with appropriate access for how you are running the DNAS Server.
There are some example configuration files which can be found in the examples folder for the following scenarios if the setup mode is not appropriate for your needs or you would like to get a better idea of what a working configuration file can look like:
sc_serv_simple - shows how to get a simple single-stream setup working
sc_serv_basic - shows how to get a more multi-stream setup working
sc_serv_public - shows how to make a public server from sc_serv_basic
sc_serv_relay - shows how to relay another source
There is more information about these example configurations in DNAS Server - section 8 and these are provided for those not happy with the 'setup mode' or 'configuration builder' mode or prefer to do things manually for specific configurations of the DNAS Server.
If the DNAS Server was not stopped after running the 'setup mode' then
this step is only needed when you next decide to start the DNAS server.
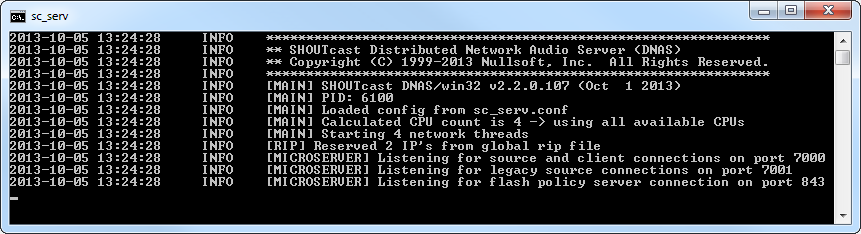
Windows - sc_serv.exe or start.bat
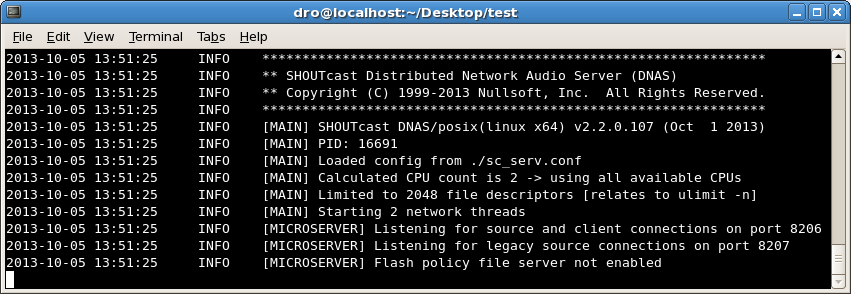
Non-Windows - ./sc_serv or ./start.sh
This will load the DNAS Server with the details entered during setup (section 3.5.1) or from an existing configuration when upgrading from an earlier version (section 3.5.1.1).
To start the DNAS Server with a specific configurartion file, enter the correct command string for the operating system you are using like the following where <conf> is the name of the configuration file in the same directory as the DNAS Server program file:
Windows - sc_serv.exe <conf> (in the command-line) or drag and drop <conf> onto sc_serv.exe
Non-Window - ./sc_serv <conf>
You can alternatively edit start.bat or start.sh (as applicable) and append <conf> to the end of the line and then run start.bat or ./start.sh directly. If the <conf> file cannot be found, the DNAS Server will attempt to provide an appropriate file to use and will prompt you to select one if possible before failing and aborting running.
For more information on running the DNAS Server see DNAS Server and the relevant section for the operating system you are using:
Windows - 3.2.3 (or 3.2 for more advanced options)
Linux / Raspbian - 3.3.3 (or 3.3 for more advanced options)
Those sections also detail how to run the DNAS Server in service mode (Windows) or as a daemon (non-Windows) which allows the DNAS Server to keep running in the background without keeping a command-line or shell window open.
Skip this section if you do not experience errors when trying to run the DNAS Server.
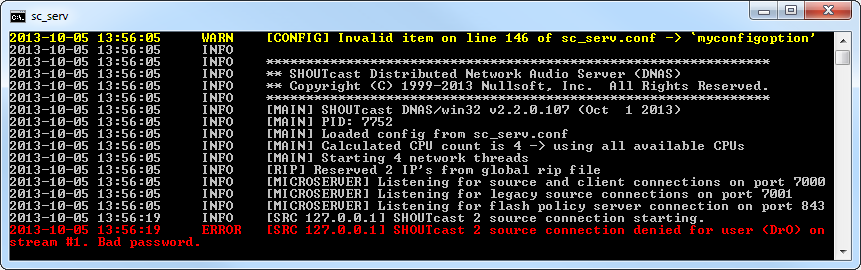
Error messages need to be resolved and in most cases will relate to the DNAS Server not being able to be listed in the Directory or due to a networking related issue. Depending on the type of error, the DNAS Server may continue to run or it will close e.g. if there are no configuration files which can be found.
If the error message(s) still do not make sense then either double-check DNAS Server -
section 4.15 or goto the SHOUTcast support forums forums.winamp.com/forumdisplay.php?f=140
and post your question / issue along with a copy of the log output including the error message. Remember that the more information you can provide to start with will make it easier for anyone else to help and give you a solution.
This is needed if you want the Stream to be listed in the Directory. If not make
sure you have specified the DNAS Server to be private or do so in the Source.
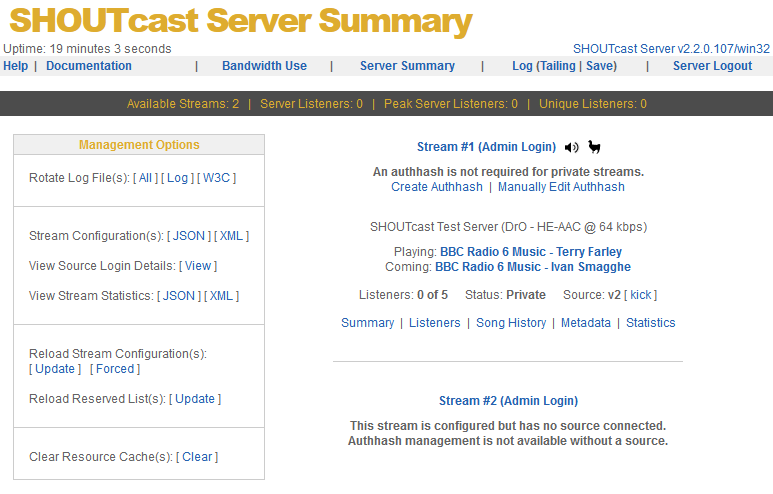
If you have un-checked 'Auto-create Authhash' during setup mode, then you will need to manually create the authhash for the stream(s) you want to be listed in the Directory. This is done via the 'Server Summary' page when a valid source has been connected to the DNAS Server. See here for how to create an authhash.
You can also find additonal information on how to manually edit an authhash such as when re-using an existing one to setup a server group or if setting up a different bitrate of an existing stream.
Skip this if you are not setting up the Transcoder for MP3 streaming.
If you want to provide an MP3 stream and are going to use the Transcoder then you will need to obtain a license key in-order to unlock the support to do this in the tool. Details on how to obtain this can be found in Transcoder - section 2.5.
AAC encoding does not need you to purchase a license as one has
already been paid for you as detailed in Transcoder - section 2.5.1.
Once the key has been obtained you need to add the key and your name into the
'unlockkeyname' and 'unlockkeycode' values in you configuration file exactly as they have been received. So if your key is '123456' and you have used 'Bob' as the registered name, you would add the following to your Transcoder configuration file:
unlockkeyname=Bob
unlockkeycode=123456
Getting the Transcoder started you first need to open up the sc_trans_simple.conf example file in the root of the install location. Work through the file's contents and then fill in or change any of the values required for how you want to use the server.
If you are wanting to use MP3 encoding then make sure you have followed section 3.6.1 and entered the required 'unlockkeyname' and 'unlockkeycode' values in you configuration file exactly as they have been received. You will be informed when later running the Transcoder if there is an issue with the MP3 license details.
Once the key has been obtained you need to add the key and your name into the 'unlockkeyname' and 'unlockkeycode' values in you configuration file exactly as they have been received. So if your key is '123456' and you have used 'Bob' as the registered name, you would add the following to your Transcoder configuration file:
Additionally there are example configuration files for the following scenarios:
sc_trans_basic - shows how to get a basic setup without relying on the Server
sc_trans_capture - shows how to use a capture device
sc_trans_dj - shows how to setup a DJ connection
sc_trans_playlist - shows how to use scheduled playlists
There is more information about these example configurations in Transcoder - section 11.
For simplicity we will only run the Transcoder in the command-line console though when your Transcoder setup is completed and everything is known to be working correctly then running as a service (Windows) or as a daemon (non-Windows) can be done to automate loading of the Transcoder.
To start the Transcoder instance you now need to enter the correct command string for the operating system you are using into the command-line console like the following which assumes using the base example configuration file in the same directory as the Transcoder program file:
For Windows - sc_trans.exe sc_trans_simple.conf
For non-Window - ./sc_trans sc_trans_simple.conf
If you use one of the other example configuration files or a different one then you can just change 'sc_trans_simple.conf' to the name or full path to the configuration file.
For more information on running the Transcoder see sc_trans.txt and the relevant section for the operating system you are using:
Windows - 2.2.3 (or 2.2 for more advanced options)
Linux / Mac OS X / BSD - 2.3.3 (or 2.3 for more advanced options)
Skip this if you experience no errors when trying to run the Server.
If an issue is reported in the output from the Transcoder then you will see lines with red (error) or yellow / orange (warning) messages. Error messages need to be resolved and in most cases will relate to the Transcoder not being able to connect to the DNAS Server.
The highlighted lines should make it clear as to what is wrong e.g. passing an invalid or missing configuration file passed would cause an error along with closing the server instance.
If the error message still does not make any sense then either double-check Transcoder or goto the SHOUTcast support forums http://forums.winamp.com/forumdisplay.php?f=140 and post your question / issue along with a copy of the log output including the error message(s). Remember that the more information you can provide to start with will make it easier for anyone else to help and give you a solution.
Skip this if you are not setting up the Source DSP plug-in in Winamp.
If you want to provide a stream and are going to use Winamp and the Source DSP then you just need to make sure to install the Source DSP plug-in using its installer and check the option to set it as the default DSP plug-in in Winamp.
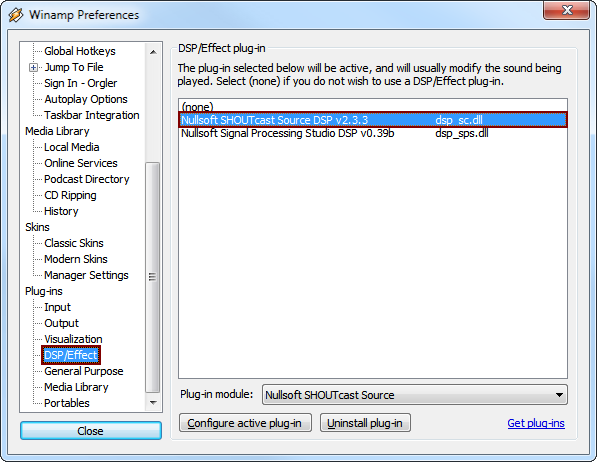
Using the Source DSP plug-in requires the plug-in to be set as the current DSP plug-in which is done by going to 'Winamp Preferences -> Plug-ins -> DSP/Effect' and selecting 'Nullsoft SHOUTcast Source DSP <version>' (*) from the list of plug-ins shown.
When this entry is selected then the plug-in's configuration window will be opened and from there the plug-in will be in a state where a connection can be started via the 'Connect' button on the 'Output' tab once all of the login details have been entered.
(*) The string <version> would be the actual version of the plug-in which is installed.
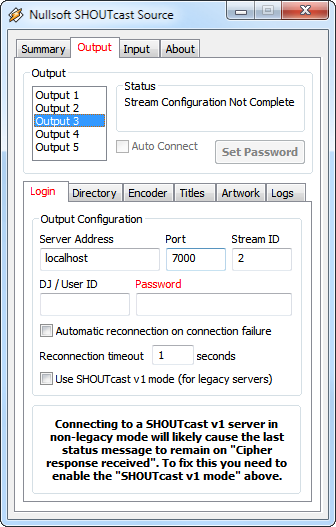
Once the Source DSP has been installed, you will need to enter the login details needed for it to be able to connect to the DNAS Server. The Source DSP should highlight values which need to be entered which can be obtained from the appropriate configuration files.
To get the Source DSP connected to the DNAS Server or the Transcoder, Source DSP Plug-in Configuration Examples shows where and what values in their configuration files are needed for the Source DSP.
You should now be up and running with a working SHOUTcast system. Happy broadcasting!
If things are still not running then go back over the section(s) relating to the tool(s) you are having issues with and make sure that you have followed things otherwise please see the next section (4.0) on what you can do to get help in trying to resolve issues.
If you have followed the setup steps detailed in section 3 and are still having issues with getting the tools running or working together to achieve a certain result then first make sure you have the currently supported version of the tool(s) in case it is a bug in the tool(s) which has already been fixed. You can check this via the links referenced in section 3.1 and especially the forum link of the most current versions available.
If installing the latest version does not help or if you already are using the latest version of the tool(s) or if the feature is not available then please goto the SHOUTcast support forums: http://forums.winamp.com/forumdisplay.php?f=140
Make sure if you are reporting issues to provide as much information as possible for the SHOUTcast users who use the tools including the following information:
Remember when you post an issue that providing as much information in a clear and concise manner will make it easier for anyone who can help to be able to understand the issue you have. This is important as not everyone visiting the forum are native English speakers.
Documentation can be found online - http://wiki.winamp.com/wiki/SHOUTcast_Broadcaster though this may not relate to the version which has been installed and it is generally recommended to check the documentation installed with the tool(s) installed as they will relate to that version (which can be found in the 'docs' folder).
Please remember that with the SHOUTcast tools being designed to work on both the Windows and non-Windows operating systems, there is information included in the documentation which can relate to either of these platforms. So when reading through the documentation, only follow the information which relates to the operating system you are using.
Included in the DNAS Server installs is a Configuration Builder mode (if installed / extracted) which can be used to create paired configuration files for the DNAS Server and Transcoder. This can be used by running builder.bat (Windows) or builder.sh (non-Windows) in the root of the folder the DNAS Server was installed into.
This is more advanced than the DNAS Server's 'setup mode and is a useful tool when wanting to make a new setup for the DNAS Server and Transcoder when the 'setup mode' or manually editing configuration files is not appropriate or something you are happy doing.
Remember that this will help to make configuration files as long as the details you enter into it are correct and that they are correctly used by the DNAS Server and Transcoder.
Client - This is a program run which will connect to the Server e.g. Winamp.
DNAS - This is an abbreviation of Distributed Network Audio Server and refers to the way SHOUTcast systems are intended in providing a Stream to multiple Clients.
Directory - This is a shortening of 'SHOUTcast Radio Directory' and is the site where if you have a public Stream where you will then be able to find your Stream.
Server - This is the program which is run on a machine to provide to Clients the Stream.
Source - This is a program or an input device e.g. the line-in connection on the Server which is providing the data for the Stream.
Stream - This is the data which is provided from the Server to the connected Client and is best thought of like the flow of water in a stream in how it goes from the Server (up stream) to the Client (down stream).
Transcoder - This is the software which can take taken different media files and convert them to a different format which is then compatible what the Stream wanted.
YP - This is an abbreviation of YellowPages and refers to the SHOUTcast Radio Directory listing which makes it easier for Clients to search for and then find your Stream.
dsp_sc - This is the name the SHOUTcast Source DSP plug-in is otherwise known as.
sc_trans - This is the name the SHOUTcast Transcoder is otherwise known as.
sc_serv or sc_serv2 - This is the name the SHOUTcast DNAS Server is otherwise known as.